Moving WordPress between hosting accounts on our servers
You can use the WordPress Manager in the hosting Control Panel to move or copy WordPress installations between different hosting accounts on our servers. The process requires that you create a backup of the original WordPress installation and import it to the account where you wish to copy or move that WordPress installation. You can refer to the respective sections about these actions in our Creating, downloading, and restoring from WordPress backups article or follow the steps below:
- Access the hosting Control Panel for the account with the original WordPress installation.
- Navigate to the WordPress Manager.
- Find the WordPress installation in the list, and click on the Manage button for it. This will take you to the management page for the WordPress installation.
- Click on the Backup now button. This will generate a backup of your entire WordPress installation - the database and the files.
- Download the backup to your local computer by clicking on the Download button.
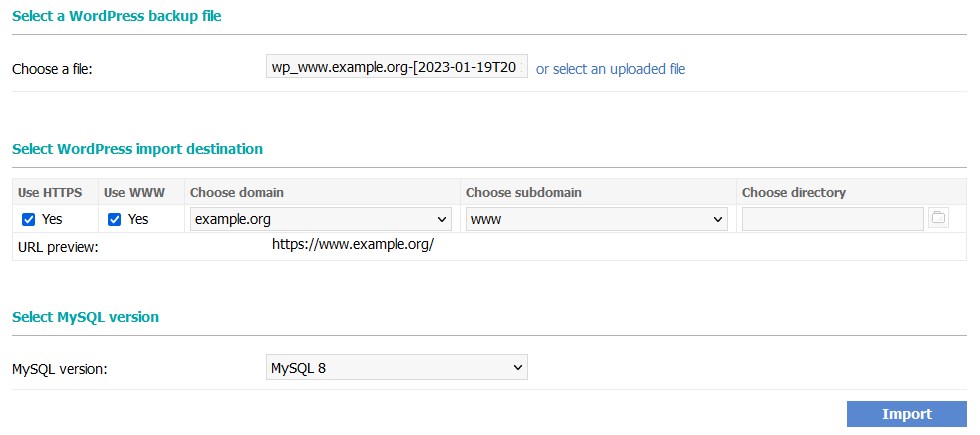
- Open the Import tab of the WordPress Manager in the Control Panel for the account where you wish to move/copy the WordPress installation.
- Click on the gray area to select the backup file on your local computer. If the file size is bigger than 200 MB, you need to upload it to the server via the hosting Control Panel's File Manager or with FTP first, and then select the uploaded backup using the or select an uploaded file link.
- Select the Site URL of the new WordPress installation using the controls in the Select WordPress import destination section. A preview of the URL is shown below the controls. The controls are as follows:
Use HTTPS: Set the site to use HTTPS instead of HTTP. This is only possible if there is a valid certificate issued for the host.
Use WWW: Add the www. prefix to the WordPress address.
Choose subdomain: Choose the subdomain from the list of subdomains created on the account.
Choose domain: Choose the domain from the list of parked and main domains on the account.
Choose directory: Choose a directory in the selected subdomain. Leave empty for the root of the domain/subdomain. - Select the MySQL version for the new WordPress installation from the MySQL version drop-down menu.
- Click on the Import button.

Depending on the size of the WordPress installation, the process might run in the background.
When you import WordPress from a backup, the tool performs the following actions:
- Imports the files to the directory.
- Creates a database and database user.
- Imports the database structure and data to the database.
- Changes the Site URL (WordPress Address) setting.
- Changes the Home (Site Address) setting.
- Performs a search and replace operation in the database, replacing the address in the backup with the new address.
The usernames and passwords for the WordPress installation will remain the same.