Installing e107 [version 2.1.9+]
You need to follow these steps to install e107:
1. Download the installation files from the site of the vendor. The application can be obtained from:
http://e107.org/get-started
2. Once you have downloaded the archive that contains the installation, you need to upload it to your hosting space.
You can either extract all the files from the downloaded archive and upload them, or you can upload the archive and use the web hosting Control Panel's File Manager to extract the package.
The best way to upload big files or multiple files is via FTP. If you are not sure how to upload the files, please check the Uploading files section from our online documentation.
If you are installing the application in your main domain, or in a subdomain, you may need to delete the default index.php file first. You can do this either via FTP or through your web hosting Control Panel's File Manager.
3. Create a new MySQL database and user for the e107 application. For security reasons, MySQL databases and users can be created only through the hosting Control Panel. Detailed instructions on the process are available in our Creating a MySQL database/user article.
Once you have the database and MySQL user created, you should associate the MySQL user with the database by following the instructions from our Associating a MySQL user with a database article. Unless you have a reason to do otherwise, you can select all available privileges for the new MySQL user.
4. To start the installation wizard, open in your browser the URL where the extracted e107 files are located.
5. After the installation has started, choose your preferred language and click on the "Continue" button to proceed.
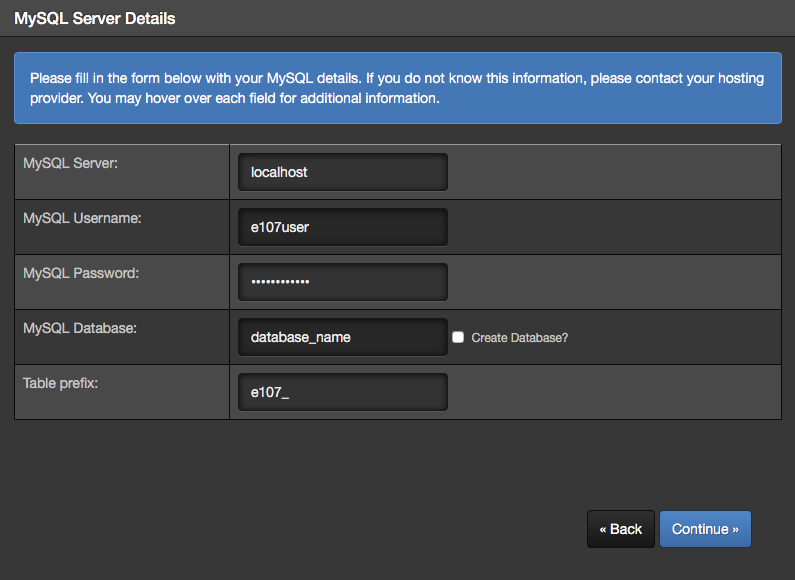
6. On the next screen "MySQL Server Details" enter the following information:
MySQL Server: You need to enter localhost for MySQL 5 or 127.0.0.1:3308 for MySQL 8.
MySQL Username: You need to enter the MySQL username you created at your web hosting Control Panel's MySQL section for your e107 application.
MySQL Password: You need to enter the password you assigned to your MySQL user.
MySQL Database: You need to specify the MySQL database you created for your e107 application. Leave the option Create Database? unchecked.
Table Prefix: Leave the default value if you are not installing multiple instances of e107 in a single database.

Click on "Continue" to proceed. You may get a prompt asking if you wish to overwrite the data on the existing database. Click the Overwrite button.
7. You will get the MySQL Connection Verification and Database Creation screen. Click Continue.
8. The installation will display the PHP and MySQL Versions Check / File Permissions Check screen. Click Continue.
9. Complete the remaining installation steps; no server-related information is required. You will need to create an administrative user for e107; select any username and password combination you want. Choose a name and a theme for your site.
10. After the installation has completed:
- delete the file install.php from the directory of е107. You can do this via FTP or through the File Manager interface of your hosting Control Panel.
- set the file permissions for e107_config.php to 644. You can find more information about changing file permissions in this article.
Important notice: You should monitor the site of the software vendor for any security updates of your installed application.