Cron Jobs
The Cron Jobs section of the Control Panel allows you to add scripts on your account as scheduled tasks. Sample scheduled tasks can be: create a backup of your account, send an email message, update certain areas of your site, etc. You can use any PHP, Perl, Python, Ruby, or other script located on your account, a URL address, or a shell command to run as a cron job. In this article you will find information about:
- Creating a new cron job (Basic Mode)
- Setting up email notifications
- Testing a cron job
- Deleting a cron job
- Using Advanced Mode
Creating a new cron job (Basic Mode)
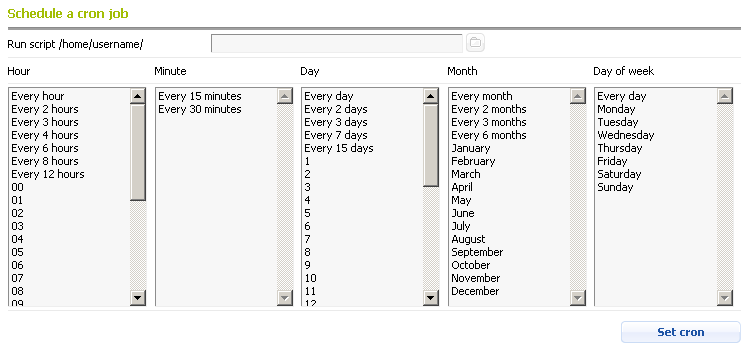
To create the cron job, use the Schedule a cron job form. You can select the script you wish to schedule for execution (e.g. /home/username/private/backup.sh), enter a URL address (e.g. https://your_domain.com/script.php) or a command (e.g. "php /home/username/www/www/wp-cron.php"). After that, choose a start time from the drop-down list, and confirm with the Set cron button.

Note: If you have specified a script on the account, it will be executed via the command line, so you need to make sure that the interpreter is defined in the first line of the script.
If you wish to execute a PHP script (e.g. /home/username/www/www/myscript.php) regularly with a cron job, you can do this by:
- setting the interpreter (e.g. /usr/local/bin/php.cli for the PHP-CLI version for the account or /usr/local/bin/php74.cli for PHP 7.4) as part of the cron job; the cron job will look like this:
/usr/local/bin/php.cli /home/username/www/www/myscript.php - adding the interpreter in the first line of your script (e.g. #!/usr/local/bin/php.cli) and setting the cron job to execute the script directly:
/home/username/www/www/myscript.php - creating a wrapper script (e.g. /home/username/private/cronjob.sh) that will execute the PHP script, and configuring the cron job to execute the wrapper script directly; the wrapper script can have the following content:
#!/bin/bash
/usr/local/bin/php.cli /home/username/www/www/myscript.php - configure the cron job to execute the script via your website using the URL:
https://www.your_domain.com/myscript.php
More information about the PHP-CLI version of the account is available in our PHP version article.
Setting up email notifications
Once you schedule a cron job, you can specify mailboxes where emails with the output generated by your cron jobs will be sent. You can choose to receive emails upon each cron job execution or only when there is output.
Testing a cron job
You can check if your cron job will execute properly by using the Run button. This will execute the cron job task and will provide you with its output. This way you can verify if all cron job settings are correct.
Deleting a cron job
To delete a cron job task, you can use the Delete button.
Using Advanced Mode
You can use the Advanced Mode tab for more scheduling options. After choosing the script/command/URL which should be executed, you can set the exact time for this action from the drop-down lists (Hour/Minute/Day/Month/Day of week). Once the time is specified, use the Set cron button to confirm your settings.
